-
Deep Residual Learning for Image Recognition 정리 및 코드 구현 by Pytorch [ResNet]AI/Computer Vision 2021. 9. 25. 19:53728x90
Deep Residual Learning for Image Recognition 정리 및 코드 구현 by Pytorch [ResNet]
1. Introduction

"Is learning better networks as easy as stacking more layers?"
-> 오히려 the problem of vanishing/exploding gradients
=> Overfitting이 문제인가?
아님. 네트워크의 층이 깊어질수록, degradation problem이 발견 (degradation problem은 layers가 깊어지면 깊어질수록 training error가 더 높아지며, 따라서 test error또한 동일하게 높아지는 현상)
-> accuracy는 saturated (마치 뭔가 가득 차서 현상태에서 더 진전이 없어져 버리는 상태)가 되고 degradation이 진행됨.
이때 degradation은 overfitting에 의해서 생겨나는 것이 아니며, 더 많은 layers를 넣을수록 training error가 더 높아짐 (만약 overfitting이었다면 training error는 매우 낮아야 함)
-> 이를 실험을 통해 확인하기 위해서, identity mapping(항등 함수 layer)을 함.
만약 층이 더 깊을수록 학습이 더 잘 된다면, 즉 overfitting이 문제라면, 가정에 따라서 identity mapping으로서 추가된 layers들은 최소한 shallower model에서 나온 예측치와 동일하거나 또는 더 깊게 들어갔으니 더 잘 학습이 되어야 함 ( training error 낮고 test error 크게 )

하지만 실험 결과, 양쪽 그래프의 경우 모두 layer 수가 더 많은 쪽이 error가 크게 등장한다는 점

이것이 의미하는 바는 multiple nonlinear layers안에서 identity mappings을 시키는데(approximate) 어려움이 있다는 것! / 네트워크에 내재된 layer를 identity하게 최적화하기는 어렵다!
2. Related Work
이전에도 Residual Representation 쓴 적 있다~
ResNet과 비슷하게 Shortcut Connection을 사용한 highway networks 같은 것도 있다~
나중에 참고로 읽어볼 것.
3. Deep Residual Learning
3.1. Residual Learning

위의 degradation problem을 해결하기 위해 등장한 개념 "Residual Mapping"
residual이란 관측치(observed data)와 예측값(estimated value)사이의 차이!
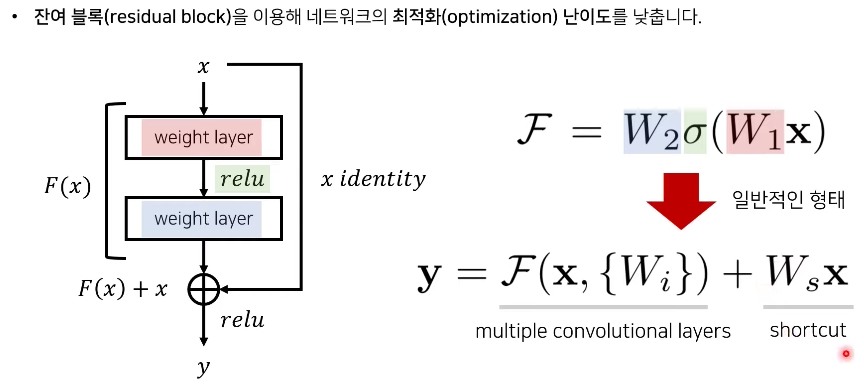
이런 degradation 문제를 해결하기 위해서, 이 논문에서는 Residual Learning을 핵심 아이디어로 제안합니다. 기존의 Neural Network는 여러 개의 nonlinear한 layer을 이용해서 복잡한 함수를 학습하는 것이라 할 수 있습니다. X가 입력 값이고 H(x)을 우리가 의도한 optimal한 mapping이라고 보았을 때, H(x)-x, 즉 f(x)를 학습하는 것이 H(x)를 학습하는 것보다 더 학습 난이도가 낮다고 합니다.
H(x)를 학습하는 것보다 f(x)를 학습하기 쉬운 이유가 납득이 안 될 수 있지만, 앞 장에서 봤던 것처럼, 추가적으로 더해지는 레이어가 identity mapping이라면 깊은 모델이 얕은 모델에 비해 training error가 더 높아지진 않아야 할 것입니다. 하지만 여러 개의 non linear한 레이어가 쌓아진 상태에서 identity mapping을 학습하는 것 자체가 어렵기 때문에, 최소한 identity mapping에 대해서라도 입력 값과 출력 값을 그대로 전해주어서 성능을 보장하고 학습 난이도를 줄여주고자 하는 것입니다.
(실제로 identity mapping이 optimal할 경우는 적지만, 이런 학습 방법을 추구하는 것만으로도 문제를 더 쉽게 해결해줄 수 있도록 합니다.)


3.2. Identity Mapping by Shortcuts

(1) Identity Shortcuts <-> (2) Projection Shortcuts


식 1은 사실 F = W2σ(W1x)를 간소화한 모양!
단순 덧셈으로 인해 복잡한 구조와 연산이 필요없다는 것이 이 방법의 핵심이기 때문에 이 로테이션을 통해 직관적으로 보여주는데, x는 relu함수 σ를 한 번 통과했고 bias는 생략해서 나타낸다.
이 때 x 와 F의 차원은 동일하게 맞춰줘야 함. 따라서 W1, W2 등의 linear projection을 사용해서 같은 차원으로 만들어준다. (Ws 는 단순히 차원을 맞춰주는 방법)
이어서 나올 Experiments를 통해 identity mapping이 degradation 문제와 효율성의 문제를 충분히 해결할 수 있다는 것을 보여줄 것!
이런 Residual Learning을 적용해서 논문에서는 하나의 block을 정의했습니다. 여기서 F는 Residual Mapping을, x는 Shortcut connection을 의미하고 이 식에서는 단순히 bias값은 고려하지 않도록 정의했습니다. 이렇게 Shortcut Connection을 사용하면 추가적인 파라미터가 사용되지 않는다는 장점이 있습니다.
추가적으로 input x의 dimension과 output x의 dimension이 같지 않을 경우에 대해서는, shortcut connection에 W_s를 곱해 linear Projection을 통해 dimension을 일치시킬 수 있습니다.
3.3. Network Architectures
Plain Network <-> Residual Network
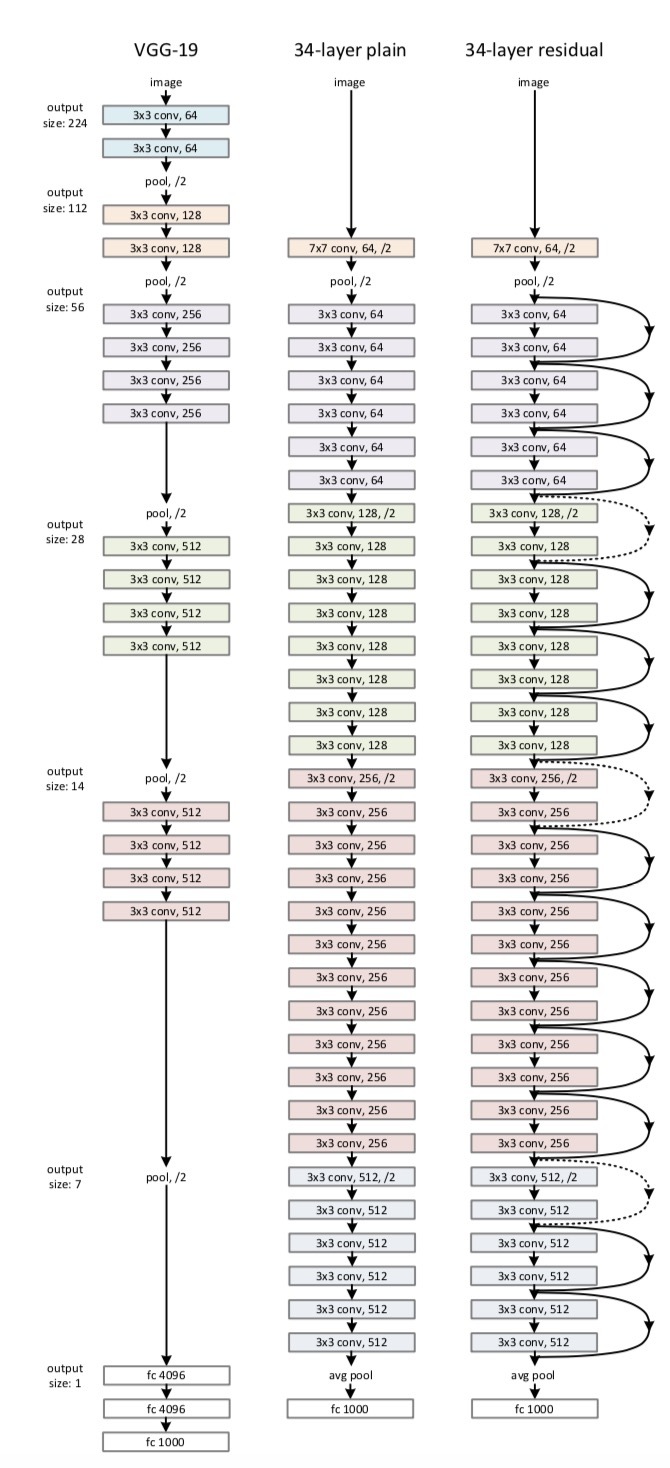
Plain Network VGG net을 참고해서 만들었습니다. 모두 동일한 feature map 사이즈를 갖게 하기 위해서 레이어 들은 동일한 수의 filter를 가지게 합니다. 또한 feature map 사이즈가 절반이 되면 filter 수는 2배가 되도록 만들었습니다. Conv layer 는 3 * 3의 filter, stride 2로 downsampling, global average pooling layer 를 사용했고, 마지막에는 softmax로 1000-way fully-connected layer를 통과시켰습니다. 최종 레이어는 34개 입니다. 이것도 VGG net에 비하면 적은 filter와 복잡도를 가지고 VGG net 의 18%의 연산 밖에 안합니다.
이와 비교해서
Residual Network 위에서 만든 Plain net을 기본 바탕으로 하지만 여기에 shortcut connection 개념을 도입합니다. Identity Shortcut은 input과 output을 같은 차원 (same dimension)으로 맞춰줘야 합니다. 그 후에 차원이 증가할 때 두 가지 방법을 사용합니다.
(A) The shortcut still performs identity mapping, with extra zero entries padded for increasing dimensions. This option introduces no extra parameter; -> 차원을 늘리기 위해 0을 넣어서 padding 하기(같은 차원으로 만들어 주기 위해서), 추가 파라미터가 없음
(B) The projection shortcut in Eqn.(2) is used to match dimensions (done by 1×1 convolutions). -> 식2에서 쓴 방법 사용 (linear projection, )
For both options, when the shortcuts go across feature maps of two sizes, they are performed with a stride of 2.
즉 input 과 output, x와 F 를 모두 같은 차원으로 만들어주는 것이 추가된 과정입니다. Shortcut Connection이란 같은 차원으로 나오는 것
3.4. Implementation
Our implementation for ImageNet follows the practice in [21, 41]. The image is resized with its shorter side randomly sampled in [256, 480] for scale augmentation [41]. A 224×224 crop is randomly sampled from an image or its horizontal flip, with the per-pixel mean subtracted [21]. The standard color augmentation in [21] is used. We adopt batch normalization (BN) [16] right after each convolution and before activation, following [16]. We initialize the weights as in [13] and train all plain/residual nets from scratch. We use SGD with a mini-batch size of 256. The learning rate starts from 0.1 and is divided by 10 when the error plateaus, and the models are trained for up to 60 × 104 iterations. We use a weight decay of 0.0001 and a momentum of 0.9. We do not use dropout [14], following the practice in [16].
In testing, for comparison studies we adopt the standard 10-crop testing [21]. For best results, we adopt the fully convolutional form as in [41, 13], and average the scores at multiple scales (images are resized such that the shorter side is in {224, 256, 384, 480, 640}).
4. Experiments
논문에서는 ImageNet Classification, CIFAR-10, Object Detection 이렇게 3가지 Task에 적용하여 비교 실험을 진행했습니다. 이번 발표에서는 ImageNet Classification task에 집중해서 발표하도록 하겠습니다.
이 부분에서도 크게 세 가지로 나누어 실험을 진행했는데요. 논문에서는 첫번째로 Plain Networks와 Residual Networks와의 비교, 두번째로 Identity와 Projection Shortcuts와의 비교, 마지막으로 50층 이상의 Resnet에서의 구조에 대해서 이야기합니다.
ResNet-50부터는 BottleNeck 구조가 쓰인다!&amp;amp;nbsp; 4절에서는 (1) Plain Networks와 Residual Networks와의 비교, (2) Identity와 Projection Shortcuts와의 비교, (3) Deeper Bottleneck Architectures가 나왔다.
(1) 3.3절에서 자세히 설명

먼저 첫번째 그래프에서, Plain Network에서 그냥 레이어를 깊이 쌓는 것이 낮은 네트워크보다 오히려 에러율이 높아진 것을 확인할 수 있습니다. 두번째 그래프에서는 ResNet의 경우, 레이어가 더 깊어질수록 오히려 수렴 속도도 빨라지고 성능이 좋아지는 것을 확인할 수 있습니다.
(2) 3.2절에서 자세히 설명
차원을 늘려주고 그대로 입력할것인가 projection shortcut을 사용할것인가.
(A) zero-padding shortcuts are used for increasing dimensions, and all shortcuts are parameterfree
(the same as Table 2 and Fig. 4 right);
(B) projection shortcuts are used for increasing dimensions, and other shortcuts are identity; and
(C) all shortcuts are projections.
(A) zero-padding shortcut는 dimension matching에 사용되며, 모든 shortcut는 parameter-free 하다(Table.2 및 Fig.4의 결과 비교에 사용됨)
(B) projection shortcut는 dimension을 늘릴 때만 사용되며, 다른 shortcut은 모두 identity다.
(C) 모든 shortcut은 projection이다.

(A), (B), (C) 방법 모두 평가해보았으나 결과는 대동소이하다.
계산의 복잡성을 줄이기 위해서 (C) 방법은 사용하지 않기로 한다.
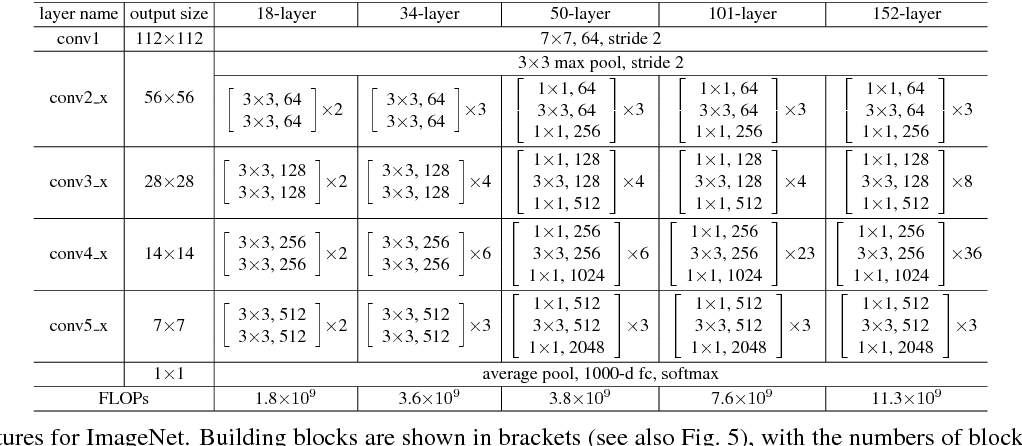
(3) Deeper Bottleneck Architectures
=> Resnet 50, 101, 152 부터는 BottleNeck 구조를 사용한다!

BottleNeck이란?
ResNet에서 왼쪽은 BottleNeck 구조를 사용하지 않았고, 오른쪽은 BottleNeck 구조를 사용했다.
-> BottleNeck의 핵심은 1x1 Convolution! ( = Pointwise Convolution / 이는 Depthwise Separable Convolution에서도 똑같은 원리로 이용된다.)
* Convolution Parameters = Kernel Size x Kernel Size x Input Channel x Output Channel
1. 채널 축소 - 256을 64로 채널을 강제로 축소한 이유는 오로지 연산량을 줄이기 위함
[1x1 Convolution에는 Spatial(공간적인) 특징을 가지고 있지 않습니다. Convolution 연산이 공간적인 특징을 추출하기 위해선 Kernel이 최소 2 이상 되어야 한다]
2. 특징 추출 - 3x3 Convolution은 특성을 추출하는 역할
=> 3 x 3 x Input Channel x Output Channel
3. 채널 증가 - CNN은 Feature Map의 특성이 많을수록 학습이 잘 되기 때문에, 1x1 Convolution으로 강제적으로 채널을 증가시켜준다!
PyTorch 구현
1) 데이터 셋 로드 및 전처리
2) BasicBlock / BottleNeck class 구현 ★
" 다른 분야에서도 Backbone으로 ResNet 모델을 사용하거나, Skip Connection에 대한 아이디어가 많이 사용되므로, BasicBlock / BottleNeck 에서 어떻게 Residual을 넘기는지 잘 확인하고 넘어가는 것이 좋다! "
Resnet 50 이하에서는 BasicBlock을, Resnet50 이상에서는 BottleNeck을 사용한다!
(1) BasicBlock class
* kernel size = 3 : vggnet의 구조를 따랐기 때문에 3x3 kernel 사이즈를 가짐!
* expansion = 1 : 그냥 feature map의 개수를 의미한다 ( just an integer number indicating the expansion in the number of feature-maps through a convolution layer ) 이게 어디서 쓰이냐면, Basic Block에서보다는 BottleNeck에서 마지막 out_channels를 늘려주기 위해 사용한다! Basic Block을 사용하는 Res-18, Res-34에서는 ConV layer의 in_channels와 out_channels가 동일하기 때문에 expansion=1! Resnet class에서 다음 block의 in_channels를 설정할 때 현재 block의 out_channels * block.expansion으로 초기화해준다ㅇㅇ
* bias = False : ConV layer의 bias를 false로 설정하는 이유는 ConV layer 뒤에 오는 BatchNorm에 bias가 포함되어 있기 때문이다!
* stride 크기 : 논문에 첨부되어있는 그림에서, /2라고 표시되어 있는 부분은 downsampling을 의미함
resnet이 기반으로 하고 있는 vgg의 경우에는 pooling을 통해 downsampling을 진행함
<-> 이와 반대로 plain model에서나 residual model에서는 pooling 대신에, ConV layer의 stride를 일부분 2로 설정하여 downsampling을 진행함
( pooling을 사용하지 않는 이유는 pooling 사용했을 때 파라미터 수가 늘어나기 때문이다! )
* padding 설정은 어케 ???
* self.shortcut : residual connection 역할을 하는 부분 !
- identity mapping : nn.Sequential()에 아무것도 담지 않고 그냥 x 자체 전달해줌
- projection mapping : nn.Sequential()에 1x1 ConV layer을 넣어준다!
=> projection mapping을 쓰는 조건인 stride!=1 or in_planes != self.expansion * planes 가 의미하는 바
- stride!=1 이라면 stride로 인해 downsampling되어, residual block을 거치기 전인 입력 차원과 residual block을 거친 후인 출력 차원의 크기가 달라지기 때문에 projection mapping 사용 (stride=stride인 이유 stride!=1이면 크기를 맞춰주기 위해 )
- in_planes != self.expansion * planes 이라면 위의 조건의 이유와 동일
- forward()에서 out += self.shortcut(x)
# 내가 구현한 resnet의 BasicBlock
class BasicBlock(nn.Module):

    # stride 크기 어떻게 정했나? - 논문의 그림을 보면 /2라는 표시는 downsampling한다는 의미
    # VGG에서는 maxpooling을 통해 downsampling했지만,
    # resnet에서는 파라미터 수(연산)를 줄이기 위해서 특정 부분을 stride=2로 지정하여 downsampling을 진행함

    def __init__(self,in_channel, out_channel,stride=1):
        super.__init__(BasicBlock,self)

        self.conv1=nn.Conv2d(in_channels=in_channel,out_channels=out_channel,kernel_size=3, padding=1,stride=stride, bias=False) # input channel 수와 output channel 수 맞지 않아서 projection 쓰는 거나 identity 하는 거 다 똑같아서~
        # BatchNorm에 bias가 포함되어 있으므로, conv2d는 bias=False로 설정한다
        self.BatchNorm2d1=nn.BatchNorm2d(out_channel)

        self.conv2=nn.Conv2d(in_channels=out_channel,out_channels=out_channel,kernel_size=3, padding=1,stride=1, bias=False)
        self.BatchNorm2d2=nn.BatchNorm2d(out_channel)

        self.shortcut=nn.Sequential() #identity mapping

        if stride!=1 or in_channel!=out_channel: # projection mapping -> 1x1 conv

            self.shortcut=nn.Sequential(
                nn.Conv2d(in_channels=out_channel,out_channels=out_channel,kernel_size=1, stride=stride, bias=False),
                nn.BatchNorm2d(out_channel)
            )

    def forward(self,x ):
        out=nn.functional.relu(self.BatchNorm2d1(self.conv1(x)))
        out=self.BatchNorm2d2(self.conv2(x))
        out+=self.shortcut(x)
        out=nn.functional.relu(out)
        return out
아래의 BasicBlock 코드와는 expansion을 제외하고는 다른 점이 없다. 내 코드에서는 expansion을 1로 가정하고 짰다!
# resnet-cifar10의 BasicBlock
class BasicBlock(nn.Module):
    expansion = 1

    def __init__(self, in_planes, planes, stride=1):
        super(BasicBlock, self).__init__()
        self.conv1 = nn.Conv2d(
            in_planes, planes, kernel_size=3, stride=stride, padding=1, bias=False)
        self.bn1 = nn.BatchNorm2d(planes)
        self.conv2 = nn.Conv2d(planes, planes, kernel_size=3,
                               stride=1, padding=1, bias=False)
        self.bn2 = nn.BatchNorm2d(planes)

        self.shortcut = nn.Sequential()
        if stride != 1 or in_planes != self.expansion*planes:
            self.shortcut = nn.Sequential(
                nn.Conv2d(in_planes, self.expansion*planes,
                          kernel_size=1, stride=stride, bias=False),
                nn.BatchNorm2d(self.expansion*planes)
            )

    def forward(self, x):
        out = F.relu(self.bn1(self.conv1(x)))
        out = self.bn2(self.conv2(out))
        out += self.shortcut(x)
        out = F.relu(out)
        return out
(2) BottleNeck class
* 위의 Basic Block 에서 채널을 축소하는 1x1 ConV layer 하나가 추가하면 된다! ( 자세한 설명은 위 논문 정리하는 곳 참고 )
* padding 크기 어케 설정?
# 내가 구현한 ResNet의 BottleNeck
class BottleNeck(nn.Module):
    def __init__(self,in_channel, out_channel, stride=1):
        super().__init__(BottleNeck,self)
        self.conv1=nn.Conv2d(in_channels=in_channel,out_channels=out_channel,kernel_size=1,stride=2,bias=False)
        self.bn1=nn.BatchNorm2d(out_channel)

        self.conv2=nn.Conv2d(in_channels=out_channel,out_channels=out_channel,kernel_size=3,padding=1, stride=1, bias=False)
        self.bn2=nn.BatchNorm2d(out_channel)

        self.conv3=nn.Conv2d(in_channels=out_channel,out_channels=out_channel * 4,kernel_size=1, stride=1, bias=1 )
        self.bn3=nn.BatchNorm2d(out_channel)

        self.shortcut=nn.Sequential()

        if stride!=1 or in_channel!=out_channel* 4:
            self.shortcut=nn.Sequential(
                nn.Conv2d(in_channels=in_channel,out_channels=out_channel * 4,kernel_size=1,stride=stride, bias=False),
                nn.BatchNorm2d(out_channel)
            )

    def forward(self,x):
        out = nn.functional.relu(self.bn1(self.conv1(x)))
        out = nn.functional.relu(self.bn2(self.conv2(out)))
        out = self.bn3(self.conv3(out))
        out += self.shortcut(x)
        out=nn.functional.relu(out)
        return out
내가 구현한 BottleNeck에서는 expansion을 적용하지 않아 그냥 expansion을 4로 가정하고 코드를 짰다. 그 점을 고려하여 아래 코드에서 세 ConV layer의 in_channels와 out_channels를 잘 체크해서 보는 것이 좋을 듯하다!
# resnet-cifar10의 BottleNeck
class Bottleneck(nn.Module):
    expansion = 4

    def __init__(self, in_planes, planes, stride=1):
        super(Bottleneck, self).__init__()
        self.conv1 = nn.Conv2d(in_planes, planes, kernel_size=1, bias=False)
        self.bn1 = nn.BatchNorm2d(planes)
        self.conv2 = nn.Conv2d(planes, planes, kernel_size=3,
                               stride=stride, padding=1, bias=False)
        self.bn2 = nn.BatchNorm2d(planes)
        self.conv3 = nn.Conv2d(planes, self.expansion *
                               planes, kernel_size=1, bias=False)
        self.bn3 = nn.BatchNorm2d(self.expansion*planes)

        self.shortcut = nn.Sequential()
        if stride != 1 or in_planes != self.expansion*planes:
            self.shortcut = nn.Sequential(
                nn.Conv2d(in_planes, self.expansion*planes,
                          kernel_size=1, stride=stride, bias=False),
                nn.BatchNorm2d(self.expansion*planes)
            )

    def forward(self, x):
        out = F.relu(self.bn1(self.conv1(x)))
        out = F.relu(self.bn2(self.conv2(out)))
        out = self.bn3(self.conv3(out))
        out += self.shortcut(x)
        out = F.relu(out)
        return out
3) resnet class 구현
* 위의 그림에서 conv1와 conv2_x의 max pooling은 코드에서는?
* Res18, Res34 모델에서는 BasicBlock, Res50부터는 BottleNeck을 적용하므로 이를 파라미터로 바꿔줄 수 있어야 함
* 모든 ResNet 모델의 최종 / 중간 channels (여기서는 그냥 planes)의 수는 64, 128, 256, 512로 동일
Resnet class에서 다음 block의 in_channels (in_planes)를 설정할 때 현재 block의 out_channels * block.expansion으로 초기화해준다ㅇㅇ
한 block의 out_channels는 그 단계의 planes * expansion
* 각 모델마다 block의 개수도 다르므로 이를 파라미터로 받아줘야 함
* ConV layers 이후, gobal average pooling 후, view로 펴주고 fully connnected layer로 class의 개수로 output 내보냄
* 각 block의 첫 stride도 1,2,2,2로 각각 다르기 때문에 (2-(1)에 있는 그림에서의 /2 표시 있는 부분 설명 참고), 세팅!
또한 같은 block이어도 첫 stride만 /2을 위한 것이지, 같은 블락을 [3,4,6,3] 나머지 2개 3개 5개 2개의 블락들은 첫 stride를 1로 시작한다 (downsampling 안하기 때문에! ) 따라서 코드로는 strides=[stride] + [1] * (num_blocks-1)
# 내가 구현한 ResNet class
class ResNet(nn.Module):
    def __init__(self,block, num_blocks,num_classes=10):
        super.__init__(ResNet,self)
        self.in_planes=64
        self.conv1=nn.Conv2d(in_channels=3,out_channels=64, kernel_size=7,stride=2)
        self.bn1=nn.BatchNorm2d(64)

        self.layer1=self._make_layer(64, block, num_blocks[0],stride=1)
        self.layer2=self._make_layer(128,block,num_blocks[1],stride=2)
        self.layer3=self._make_layer(256,block,num_blocks[2],stride=2)
        self.layer4=self._make_layer(512, block,num_blocks[3],stride=2 )
        self.linear=nn.Linear(512*block.expansion, num_classes)

    def _make_layer(self, planes,block,num_blocks,stride):
        strides=[stride] + [1] * (num_blocks-1)
        layers = []
        for stride in strides:
            layers.append(block(self.in_planes, planes, stride))
            self.in_planes = planes * block.expansion
        return nn.Sequential(*layers)

    def forward(self, x):
        out = nn.functional.relu(self.bn1(self.conv1(x)))
        out = self.layer1(out)
        out = self.layer2(out)
        out = self.layer3(out)
        out = self.layer4(out)
        out = nn.functional.avg_pool2d(out, 4)
        out = out.view(out.size(0), -1)
        out = self.linear(out)
        return out


def ResNet18():
    return ResNet(BasicBlock, [2, 2, 2, 2])


def ResNet34():
    return ResNet(BasicBlock, [3, 4, 6, 3])


def ResNet50():
    return ResNet(BottleNeck, [3, 4, 6, 3])


def ResNet101():
    return ResNet(BottleNeck, [3, 4, 23, 3])


def ResNet152():
    return ResNet(BottleNeck, [3, 8, 36, 3])
# resnet-cifar10의 ResNet Class
class ResNet(nn.Module):
    def __init__(self, block, num_blocks, num_classes=10):
        super(ResNet, self).__init__()
        self.in_planes = 64

        self.conv1 = nn.Conv2d(3, 64, kernel_size=3,
                               stride=1, padding=1, bias=False)
        self.bn1 = nn.BatchNorm2d(64)
        self.layer1 = self._make_layer(block, 64, num_blocks[0], stride=1)
        self.layer2 = self._make_layer(block, 128, num_blocks[1], stride=2)
        self.layer3 = self._make_layer(block, 256, num_blocks[2], stride=2)
        self.layer4 = self._make_layer(block, 512, num_blocks[3], stride=2)
        self.linear = nn.Linear(512*block.expansion, num_classes)

    def _make_layer(self, block, planes, num_blocks, stride):
        strides = [stride] + [1]*(num_blocks-1)
        layers = []
        for stride in strides:
            layers.append(block(self.in_planes, planes, stride))
            self.in_planes = planes * block.expansion
        return nn.Sequential(*layers)

    def forward(self, x):
        out = F.relu(self.bn1(self.conv1(x)))
        out = self.layer1(out)
        out = self.layer2(out)
        out = self.layer3(out)
        out = self.layer4(out)
        out = F.avg_pool2d(out, 4)
        out = out.view(out.size(0), -1)
        out = self.linear(out)
        return out


def ResNet18():
    return ResNet(BasicBlock, [2, 2, 2, 2])


def ResNet34():
    return ResNet(BasicBlock, [3, 4, 6, 3])


def ResNet50():
    return ResNet(Bottleneck, [3, 4, 6, 3])


def ResNet101():
    return ResNet(Bottleneck, [3, 4, 23, 3])


def ResNet152():
    return ResNet(Bottleneck, [3, 8, 36, 3])
4) train
5) test(evaluate)
728x90'AI > Computer Vision' 카테고리의 다른 글